Flash failure detection in Windows 11
If you encounter the message “Please insert a disk into USB drive” or “Windows was unable to complete the format” while formatting the flash drive in Windows 11, these messages can indicate a failure or a problem with the flash drive. To solve this problem, you can use PowerShell.

Also, if the USB is configured as a flash boot, this will help you use the USB for a new partition.
In this article, we will review the steps to format and repair the flash that is not available, is not recognized, and cannot be used in Windows 11.
Fix USB drive problem using PowerShell in Windows 11:
To repair a USB drive using PowerShell in Windows 11, follow the steps below.
- Open Start in Windows 11
- Search for PowerShell, right-click on the result, and select Run as administrator
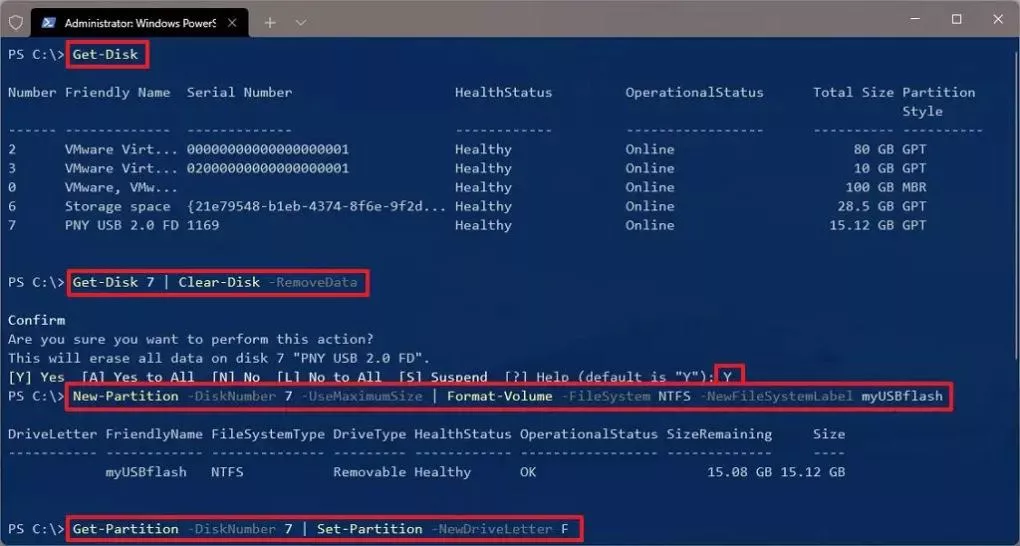
- Enter the following command to identify the flash and press Enter
Get-Disk
- Type the following command to erase the entire drive and press Enter(change the number “7” to the number of the disk drive you want to repair)
Get-Disk 7 | Clear-Disk – RemoveData
If you specify the wrong number, it will delete the drive whose number you entered.
- Type Y to delete the specified drive and press Enter
- Enter the following command to create a partition in NTFS format and press Enter:
New-Partition -DiskNumber 7 -UseMaximumSize | Format-Volume – FileSystem NTFS – NewFileSystemLabel myUSBflash
In the command, enter the number of the USB drive you want to fix and change “myUSBflash” to the name you want to use for storage.
- Type the following command to assign a drive letter to USB and press Enter:
Get-Partition -DiskNumber 7 | Set-Partition-NewDriveLetter F

To receive any advice regarding mobile and laptop repairs, send your problems below this post. Our colleagues will answer you.


